Policies (ULTIMATE ALL)
- Introduced in GitLab 13.10 with a flag named
security_orchestration_policies_configuration. Disabled by default.- Enabled on self-managed in GitLab 14.3.
- Feature flag removed in GitLab 14.4.
Policies in GitLab provide security teams a way to require scans of their choice to be run whenever a project pipeline runs according to the configuration specified. Security teams can therefore be confident that the scans they set up have not been changed, altered, or disabled. You can access these by navigating to your project's Secure > Policies page.
GitLab supports the following security policies:
Security policy project
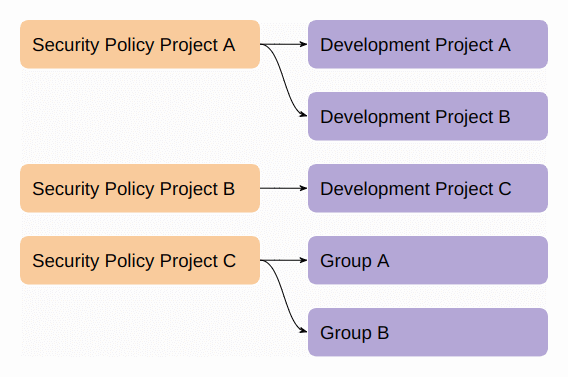
All security policies are stored as YAML in a separate security policy project that gets linked to the development project, group, or sub-group. This association can be a one-to-many relationship, allowing one security policy project to apply to multiple development projects, groups, or sub-groups:
- For self-managed GitLab instances, linked projects are not required to be in the same group or the same subgroup as the development projects to which they are linked.
- For GitLab SaaS, the security policy project is required to be in the same top-level group as the development project, although, it is not necessary for the project to be in the same subgroup.
Although it is possible to have one project linked to itself and to serve as both the development project and the security policy project, this is not recommended. Keeping the security policy project separate from the development project allows for complete separation of duties between security/compliance teams and development teams.
All security policies are stored in the .gitlab/security-policies/policy.yml YAML file inside the
linked security policy project. The format for this YAML is specific to the type of policy that is
stored there. Examples and schema information are available for the following policy types:
Most policy changes take effect as soon as the merge request is merged. Any changes that do not go through a merge request and are committed directly to the default branch may require up to 10 minutes before the policy changes take effect.
Managing the linked security policy project
NOTE: Only project Owners have the permissions to select, edit, and unlink a security policy project.
As a project owner, take the following steps to create or edit an association between your current project and a project that you would like to designate as the security policy project:
- On the left sidebar, select Search or go to and find your project.
- Select Secure > Policies.
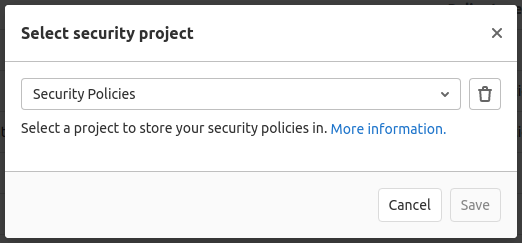
- Select Edit Policy Project, and search for and select the project you would like to link from the dropdown list.
- Select Save.
To unlink a security policy project, follow the same steps but instead select the trash can icon in the modal.
Viewing the linked security policy project
All users who have access to the project policy page and are not project owners will instead view a button linking out to the associated security policy project. If no security policy project has been associated then the linking button does not appear.
Policy management
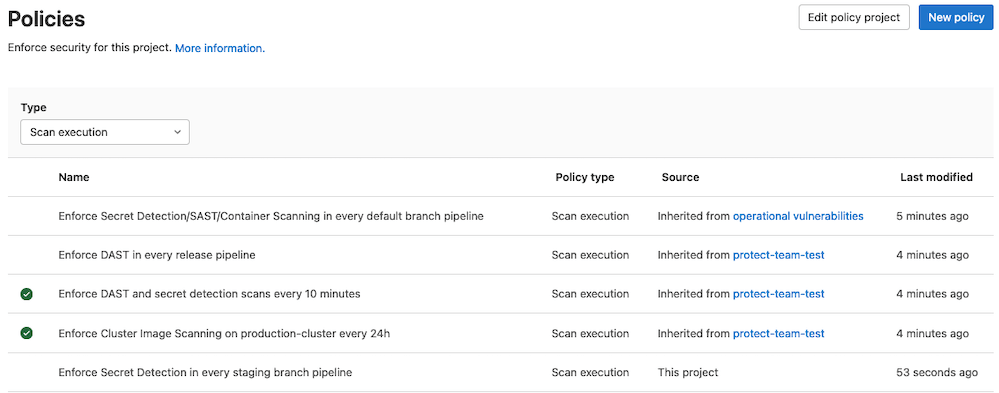
The Policies page displays deployed policies for all available environments. You can check a policy's information (for example, description or enforcement status), and create and edit deployed policies:
- On the left sidebar, select Search or go to and find your project.
- Select Secure > Policies.
Policy editor
Introduced in GitLab 13.4.
You can use the policy editor to create, edit, and delete policies:
- On the left sidebar, select Search or go to and find your project.
- Select Secure > Policies.
- To create a new policy, select New policy which is located in the Policies page's header. You can then select which type of policy to create.
- To edit an existing policy, select Edit policy in the selected policy drawer.
The policy editor has two modes:
-
The visual Rule mode allows you to construct and preview policy rules using rule blocks and related controls.

-
YAML mode allows you to enter a policy definition in
.yamlformat and is aimed at expert users and cases that the Rule mode doesn't support.
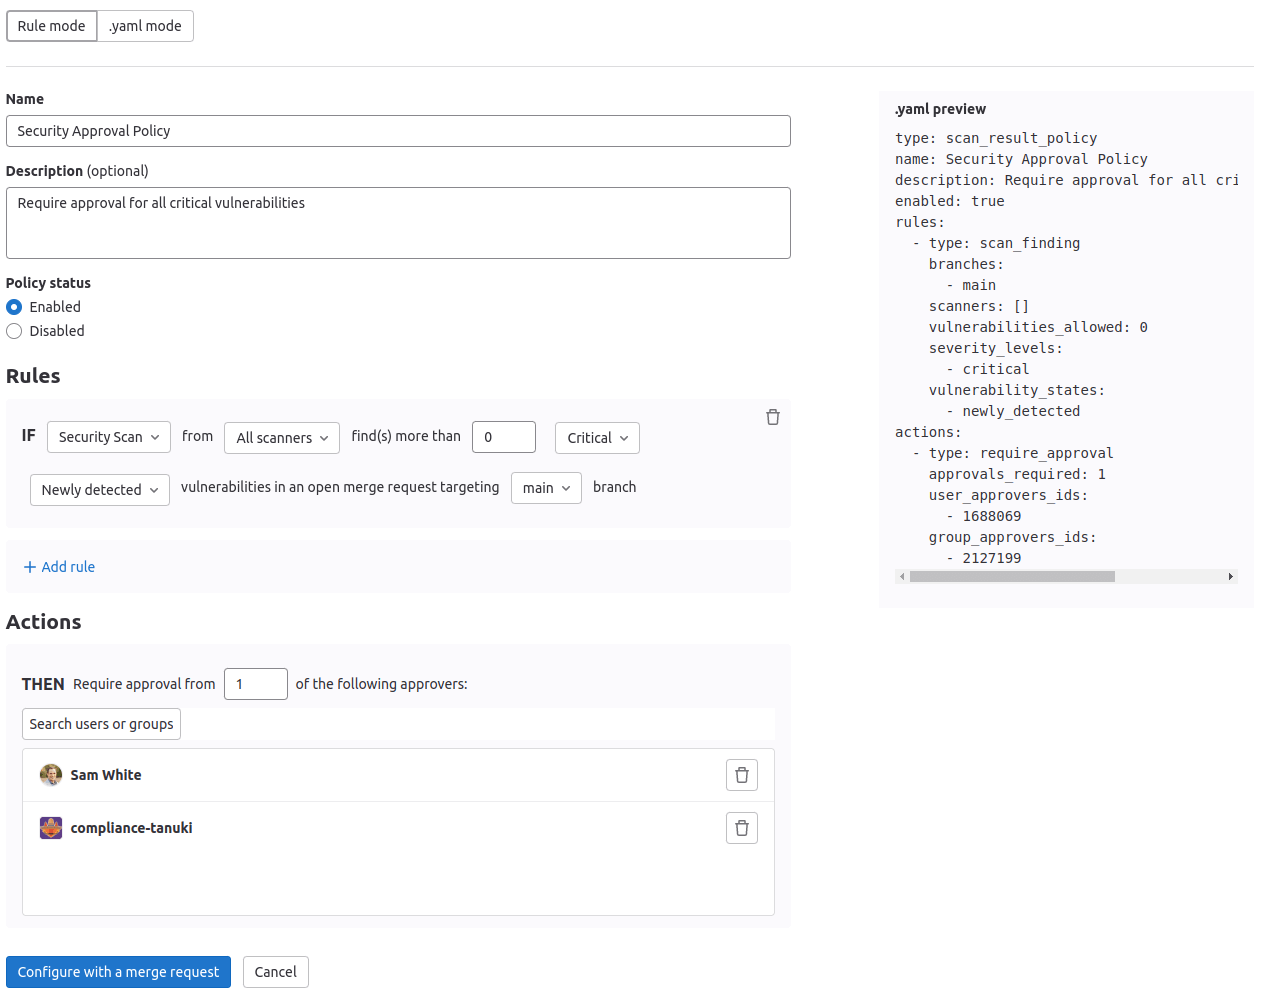

You can use both modes interchangeably and switch between them at any time. If a YAML resource is incorrect or contains data not supported by the Rule mode, Rule mode is automatically disabled. If the YAML is incorrect, you must use YAML mode to fix your policy before Rule mode is available again.
When you finish creating or editing your policy, save and apply it by selecting the Configure with a merge request button and then merging the resulting merge request. When you press this button, the policy YAML is validated and any resulting errors are displayed. Additionally, if you are a project owner and a security policy project has not been previously associated with this project, then a new project is created and associated automatically at the same time that the first policy merge request is created.
Managing projects in bulk via a script
You can use the Vulnerability-Check Migration script to bulk create policies or associate security policy projects with development projects. For instructions and a demonstration of how to use the Vulnerability-Check Migration script, see this video.
Troubleshooting
Branch name 'update-policy-<timestamp>' does not follow the pattern '<branch_name_regex>'
When you create a new security policy or change an existing policy, a new branch is automatically created with the branch name following the pattern update-policy-<timestamp>. For example: update-policy-1659094451.
If you have group or instance push rules that do not allow branch name patterns that contain the text update-policy-<timestamp>, you will get an error that states Branch name 'update-policy-<timestamp>' does not follow the pattern '<branch_name_regex>'.
The workaround is to amend your group or instance push rules to allow branches following the pattern update-policy- followed by an integer timestamp.
Troubleshooting common issues configuring security policies
- Confirm that scanners are properly configured and producing results for the latest branch. Security Policies are designed to require approval when there are no results (no security report), as this ensures that no vulnerabilities are introduced. We cannot know if there are any vulnerabilities unless the scans enforced by the policy complete successfully and are evaluated.
- For scan result policies, we require artifacts for each scanner defined in the policy for both the source and target branch. To ensure scan result policies capture the necessary results, confirm your scan execution is properly implemented and enforced. If using scan execution policies, enforcing on
all branchesoften address this need. - When running scan execution policies based on a SAST action, ensure target repositories contain proper code files. SAST runs different analyzers based on the types of files in the repository, and if no supported files are found it will not run any jobs. See the SAST CI template for more details.
- Check for any branch configuration conflicts. If your policy is configured to enforce rules on
mainbut some projects within the scope are usingmasteras their default branch, the policy is not applied for the latter. You can define policies to enforce rules generically ondefaultbranches regardless of the name used in the project or onall protected branchesto address this issue. - Scan result policies created at the group or sub-group level can take some time to apply to all the merge requests in the group.
- Scheduled scan execution policies run with a minimum 15 minute cadence. Learn more about the schedule rule type.
- When scheduling pipelines, keep in mind that CRON scheduling is based on UTC on GitLab SaaS and is based on your server time for self managed instances. When testing new policies, it may appear pipelines are not running properly when in fact they are scheduled in your server's timezone.
- When enforcing scan execution policies, security policies use a bot in the target project that will trigger scheduled pipelines to ensure enforcement. When the bot is missing, it will be automatically created, and the following scheduled scan will use it.
- You should not link a security policy project to a development project and to the group or sub-group the development project belongs to at the same time. Linking this way will result in approval rules from the Scan Result Policy not being applied to merge requests in the development project.
- When creating a Scan Result Policy, neither the array
severity_levelsnor the arrayvulnerability_statesin thescan_findingrule can be left empty; for a working rule, at least one entry must exist. - When configuring pipeline and scan result policies, it's important to remember that security scans performed in manual jobs aren't verified to determine whether MR approval is required. When you run a manual job with security scans, it won't ensure approval even if vulnerabilities are introduced.
If you are still experiencing issues, you can view recent reported bugs and raise new unreported issues.